blog
Scan QR Code To Quick Access The Digital Orbis
Showing posts with label How to guide. Show all posts

Goo.gl & Bit.ly Public Analytics

URL shortening is a technique on the World Wide Web in which a Uniform Resource Locator (URL) may be made substantially shorter in length and still direct to the required page. This is achieved by using a redirect on a domain name that is short, which links to the web page that has a long URL.
Goo.glBit.ly are the two most famous URL shortening techniques that are being used by the millions of people every day.
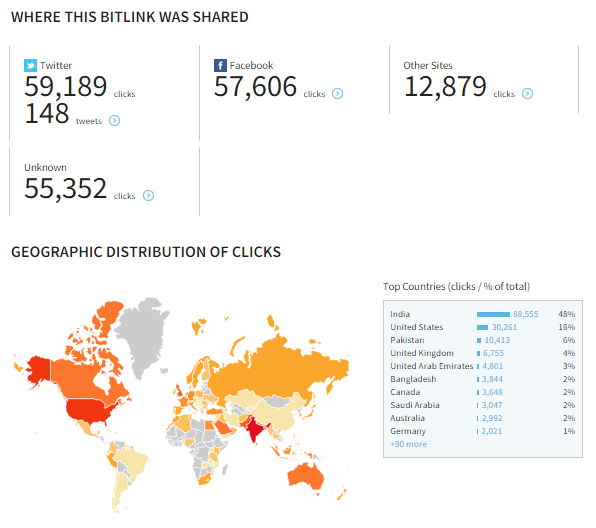
This technique is especially convenient for tracking link activities(total clicks, times shared on social media, analytics by country) messaging technologies that limit the number of characters that may be used in a message, such as Twitter, and for reducing the amount of typing required if the reader is copying a URL from a print source. In November 2009, the shortened links of the URL shortening service Bit.ly were accessed 2.1 billion times.
Generating short URLs are quite easy. We just put long URL of website and URL shortening sites generate short URL for that long URL. Most of the URL shortening websites give us facility to track and analyze the link statics on web e.g Goo.gl, Bit.ly.

bit.ly URL shortening

goo.gl URL shortening

Goo.gl & Bit.ly Public Anaytics:

To know all anaytics about your short URL generated with Goo.gl or Bit.ly. You can know it just by knowing the short URL. You have to put a + after your shorten URL and you will get all the details about that short URL. It is the quite common technique but it is known by few peoples only.
For e.g. if my short URL is goo.gl/fb/hiy1hg then anaytics for this short URL can be viewed by goo.gl/fb/hiy1hg+ same thing works for bit.ly short URLs.

bit.ly analytics


I found this thing so cool that's why I thought to share it with you all. So, please let me know how do you like it! Share your comments and views! will meet you in next post. Till then b.bye! take care! :)
Continue Reading...

[How To] do Reverse Google Image Search on Your Mobile Phone

The Reverse Google Image Search option is the best way to discover related images on web. It works very well on desktop but, Google has not made available this option for mobile phones. As approx 23% of Google searches have been done on mobile phones, Google should made Reverse Google Image Search option available on mobile phones too.
But, happiness is here as a well known Indian professional blogger Amit Agarwal (Labnol) has added a web app in his project library website. This tool helps you to access the Reverse Google Image Search on mobile phones and tablets too.


Steps to use it:

  1.  For use it, you just have to head over to ctrlq.org/google/images on your mobile phone.
  2. Click the “Select Image” button and choose an image from the photo gallery of your phone.
  3. Next click “Search” and it will upload your photo to Google Images much like the desktop version.

How it works?

It uses the standard HTML5 File System APIs. Internally, it takes your image file, converts it to Base64 (data URI) and submit the encoded image as HTTP POST request to Google Image. The browser then automatically redirects to the search page.


Compatibility

He has tested the search app on Chrome for Android and Safari for iPad but it should work on most other devices since it uses the standard HTML5 File System APIs. So, every browser which supports HTML5 will be able to run this web app.


Screenshots

Courtesy: Labnol.org


I'm only sharer of this web app. It was developed by Amit Agarwal (Labnol) and published by him.

Share your comments and views on this web app below. :)
Continue Reading...

[How To] Send Fax Online in the Absence of a Fax Machine

Do you know you can send a fax from your computer for free? Today in this short tutorial I will see how to send free online fax with tons of services available on the market.

Your eyes might have lit up with the word FREE, but every free online fax service has some limitations. They are more of Freemium type services. However, still you will able to send an occasional fax without paying anything.

The services that I am going to share, work on a basis of sending a fax from your computer, using a third party service to accept that document via email and sending that received email to a fax machine by traditional way of dialing a fax number that is then received by the final destination.

Supplies Needed:


  • A Computer with Internet Connection
  • Email account
  • Third party service like RingCentral, MyFax etc.


Instructions to be followed:

1. Make a free account on MyFax that allow you to send a fax for a month as a free trial. Like I said before if you are an occasional fax sender you might get everything for free. MyFax allows you to send a free online fax without paying anything for a full month.

2. Fill the form that say Send a fax for free one time below:

myfax free trial fax online free


3. The form needs to be filled up with sender info and receiving end info. You can attach your text message or a file made in .doc or .pdf format.

4. After filling up everything you just need to click on send, and you will receive a notification on your email about the successful delivery.


Conclusion:

Sending and receiving fax online has been made simple with tons of companies providing online fax services. If you are an occasional sender, then you do not need to pay anything as many faxing services will allow you to send a fax for free in the first month of trial. Few more of these services may charge a nominal fee. Remember to cancel any membership before your 30-day free trial period is over, as these services will ask for your credit card info that will be charged after your trial expires.

Do share your experience with us, and/or reviews with the online faxing services from the comment section below.
Continue Reading...

[How To] See GIF Animations Moving in Google Image Search in Chrome

It's been a long time since my last post. But, my this post is worth the wait. In this post, I've shared about seeing the GIF animations moving in Google Image Search.


If you like to share GIFs with friends and family to better convey your thoughts or feelings, then you've probably searched for them on Google at least once. The main issue with using Google is that none of the GIFs in the results show animations until you click to enlarge them. This makes the process of finding the right GIF much more tedious than necessary. Services like Giphy have stepped in to help you find the right GIF at the right moment, but sometimes you need the searching power offered by Google.

As a solution, TechCrunch shared a useful Chrome extension called GoogleGIFs that will display animated images in the search results, so you don't need to do any extra clicking.

To use it, you'll just need to install a copy of GoogleGIFs for your Chrome Web browser. Next, head to Google Images and search for "[subject] gif." You'll see the results load in all of their animated glory.

What do you think of this extension in comparison to Giphy? Share your thoughts in the comments.


[Source: CNET]
Continue Reading...

[How To] Make An Inaccessible, Undeletable & Unrenamable Folder

Make An Inaccessible, Undeletable & Unrenamable Folder


Basic Concept

The basic concept behind this trick is the use of Keywords. Keywords are reserved words in any programming language that cannot be used as names of variables. Windows also uses certain keywords in its programming. Some of them are: con, aux, lpt1, lpt2, lpt3, lpt4, lpt5, lpt6, lpt7, lpt8, lpt9.

Testing
To test this concept, make a new folder in Windows and try to give it a name same as any keyword mentioned above.

Inaccessible Folder Created Using CMD


Result
Windows will not rename your folder to any of the keyword given above.

Trick
So the question arises, how can we make a folder with a keyword as its name? The solution to this problem is included in Windows itself. As we know that Windows has evolved from DOS, its commands can be used in Windows. You can use DOS Programming in Windows to create a folder with a keyword as its name using the steps given below:

Step 1: Click on Start.

Step 2: Click on Run. Type in cmd.

Step 3: In the Command Prompt Window, type the name of the drive you wish to create your folder in the format : and press  e.g. If you wish to create the undeletable folder in D drive, type "D:" without the quotes. Note that the folder cannot be created in the root of C: drive (if C: is your system drive).
Step 4: Type this command:

md con\ 

(where, con\  is the keyword used for folder name) and press . You can choose any of the keywords given above as the name of your folder.

Step 5: Now Windows will create an undeletable, unrenamable & inaccessible folder in the drive you entered in Step 3. However, the folder can be renamed to another keyword using Windows Explorer.


Post You May Like: [Tool] Who Is The Owner Of A Blogger Blog/Website?


Deleting the Folder
Although, it is not possible to delete the folder using Windows GUI, you can delete the folder by typing

rd con\


(where, con\  is the keyword used for folder name)

Windows Compatibility: Windows XP and higher versions.

Try it yourself to create one such folder which can neither be deleted, accessed nor be renamed & share your experience in the comments.

Continue Reading...

[Tool] Who Is The Owner Of A Blogger Blog/Website?


This simple online tool helps you to know the author of a blogger blog/website. As this tool uses Google Data API. So, you can retrieve the author details of a blogger blog (blogspot.com) or website hosted in blogger ONLY. You have to just type his blog/website main URL below and you'll get author's name with his/her picture. Any suggestions would be appreciable.


So, Don't wait! Because, here is the thing. Check this awesome Tool & share your comments :)


Continue Reading...

[How To] Save Web Pages As PDF Using Chrome Easily

Chrome Browser Download Web Pages As PDF Files

There are plenty of software and plugins available for your web browser that help you to save a web page as a PDF file. But, what if I tell you that you can save a web page with some few clicks on your Google Chrome Browser? Yeah! I know, it would be great. As PDF file format is quite famous since it is used for sharing documents and known for its manner of being independent of application software, hardware and operating systems.


Continue Reading...

[How To] Remove Shortcut (.lnk) Virus On Windows Using Command Prompt


Steps to remove shortcut virus on Windows:

Step 1: First of all, find out in what drive of your computer the viruses/shortcuts are located. Go to My Computer (for Windows 7 or below) or This PC; you'll notice the C, D, E etc drives.

[Note: This method is the best for removable storage devices]

Step 2: Open the Command Prompt.

Step 3: Type the following commands in Command Prompt & press ENTER

For example, the virus is located in "F" drive, then just type

f:

attrib -h -r -s /s /d f:

del /s *.lnk


f: -> beside the /d is your drive, simply change it to where drive the virus is located.
-h -> to unhide all files on drive (in our case f:).
-r -> create the files on drive is free of read-only attribute.
-s -> to remove the system files attribute from files created by virus.
/s -> to apply attributes on sub-directories also.
/d -> process folders as well.
*.lnk -> delete all files with extension .lnk

Step 4: Check your drive again. All hidden files & folders are now retrieved.
Remove unnecessary files, the shortcut files that are not supposed to be there.
You might find autorun.inf or desktop.ini; simply delete them.

Step 5:  You may also scan your computer/drive with Windows Defender or any other good anti-virus(like Avast!), too. Make sure that the software is updated.
Continue Reading...

[How To] Unsend A Sent Email From Your Gmail Account


Oops, you've just sent off an angry email to your boss from your Gmail account. Should you start looking for a new job? Not if you've enabled Gmail's Undo Send feature.

We've all sent emails on the spur of the moment that we've regretted. Certain email programs offer an option to recall or retract an email, but that doesn't necessarily mean the recipient won't still receive it. Gmail's Undo Send feature works differently in that it actually waits to send your email, giving you a certain amount of time to change your mind and prevent it from being sent. But you have to be quick, as Gmail gives you only a specific number of seconds to halt your email.

Undo Feature Screenshot


The Undo Send feature is now an official part of Gmail, no longer relegated to mere beta status in Gmail Labs. In honor of its new status, let's see how the the feature works:


  1. First, log in to your Gmail account on your computer.
  2. In the upper right corner of the screen, click the Settings icon (the one that looks like a gear).
  3. From the Settings menu, choose the option for Settings.
  4. From the Settings window, make sure the General tab is selected.
  5. Look for the setting that says Undo Send.
  6. Click the check box to Enable Undo Send.
  7. Click the drop-box to set the Send cancellation period, meaning the number of seconds you have to prevent the email from being sent. You can choose 5, 10, 20 or 30 seconds.
  8. Scroll to the bottom of the Settings screen and click the Save Changes button.
  9. To test the feature, click the Compose button at the upper left corner of your Gmail account page.
  10. Compose a message and then click the Send button.
  11. At the top of the screen, you'll see a message that says: "Your message has been sent. Undo. View Message."
  12. To prevent the message from being sent, click the Undo link.
  13. Gmail stops the message from going out and displays it in case you wish to make any changes and then resend it. If not, you can simply close the message, and it's relegated to your Drafts folder where you can keep it or delete it.


The Undo Send feature is a handy way to ensure that the wrong email doesn't get sent to the wrong person.
Continue Reading...

[How To] Run Android Apps Through Chrome Browser On Any OS

A minor revolution in the apps world, Google’s new ARC Welder software allows users to run Android mobile apps through the Chrome browser on any operating system: Windows, Mac OS, Linux, or of course Chrome OS.

To bring your favorite Android apps to a PC or Mac, simply install the Chrome browser and a program called ARC Welder. Once opened, the latter program requests access to an APK file that corresponds to the app you wish to run.


Initially accessible only to developers, ARC Welder is now available to the general public through the Chrome Web Store. Still in the beta phase, the program is not entirely stable yet and can only run one app at a time. So far, Google has only made a few Android apps compatible with the program.

In the long run, however, Google’s goal is to make all of its Android apps available across multiple platforms (smartphones, tablets and desktop/laptop computers), a little like Microsoft’s idea with its forthcoming OS, Windows 10, and its dedicated multi-platform app store.

Try out ARC Welder to run Android apps on a PC or Mac.
Continue Reading...

[How To] See If Your Emails Are Being Tracked

You might not realize it, but there are now email-tracking tools that make it easy for people to see when you open an email, what you click, and where you're located.

"Emails appear no different to your contacts, but you get data when, where, and how a contact interacts with your message," says a cheery video advertising Bananatag, an email-tracking service for Gmail designed for job seekers, advertisers, and those working in public relations. 

In response, a handy new tool called Ugly Email shows you when your emails in Gmail are being tracked, and it starts working before you click anything. 


When Ugly Email is installed, a tiny little eye symbol appears next to any email in an inbox that is being tracked by tools like Bananatag, Streak, or Yesware. 

Installing Ugly Email is easy. First, you'll need to make sure you're using Google Chrome as your web browser. 

Next, click this link to take you to Ugly Email on the Chrome Web Store, click the "Add to Chrome" button, and you're all set. 

Any email arriving in your Gmail inbox will then be vetted for tracking tools, and the Ugly Email team promises that it is "actively working on adding more" email-tracking services to its list. 

Ugly Email just showed up on Product Hunt, so if you're looking for a similar email-alert service that has been around for a while longer, you can always try out PixelBlock, which does the same thing.

Source: TOI
Continue Reading...

[How To] Download Files To Dropbox, Google Drive, Box or Microsoft OneDrive Directly

Cloud storage is becoming increasingly popular nowadays and as most of you might have already known, Google drive is now offering 15GB of free cloud storage space to everyone. Apart from the ones who are aware of these, most other users never make any use of this free storage. So lets know more about an interesting way to make the best use of this free cloud storage.


You can make very efficient use of this free storage by uploading all your important files from your PC to any of the cloud storage listed above, Or you can even use these free storages to download and save files directly from the Internet. This method can be very useful when you are browsing the internet from a device which has very limited storage space.

So by downloading files directly from the internet to your Cloud storage, you would be transferring files within the cloud, which will help you save the bandwidth that would otherwise be wasted by downloading it.

Developed by well-known Indian Blogger Amit Agarwal (that's not me BTW :p), Save Web Files is a very useful web tool that can help you with downloading files directly to Google drive or other services like dropbox, Skydrive or Box. Using the service is very simple, simply head over to the site and enter the download link of any file in the input box provided.Next you need to click on any of the web services to which which you need to download the file and follow the instructions.


This web app works flawlessly on both PC’s, smartphones and other hand held devices as well. So, just head over to Save Web Files and enjoy! ;)
Continue Reading...

[How To] Convert Audio/Video Files Using VLC Player

We all have been in a situation which has required converting an audio or a video file into another format. It’s a fact that converting audios/videos is one heck of a task when it comes to finding an appropriate software for this.We use different software to do the job and frankly speaking they do their job very well. The worst part comes at the time of installing these free software. They ask to install different kinds of other tools claiming to speed-up the PC and different kind of browser extensions to your computer.And this sucks!


Now here’s a better solution.Everybody uses VLC Media Player.Almost 89% of the computer users prefer VLC over all other players.So what if you could simply convert your files using your VLC player? Thats Right.. Here’s a simple trick which you can actually do to convert audio/video files.

STEPS

1.Open you VLC media Player. Click on MEDIA on top left of your window. MEDIA–>COVERT/SAVE or simply press CTRL+R.


2.Click On ADD and add the files you need to convert.Once the File has been added click on CONVERT/SAVE button.


3.Click on the Drop Down Menu available next to PROFILE. Select the desired format


4.Now select the destination and click on START.


Note:


  • Make sure to pick the right format for your device on which you are going to play the converted content.
  • If the video is large, you’ll see the timer on the player progress as it encodes to the new format.


So, why bother installing different software and getting irritated when you have your music and video converter already embedded in your VLC media player. Also, the best part is that it provides you different formats to convert including “Video for Android HD, SD and video for YouTube HD, SD”.

Here is a list of formats that can be converted using VLC media converter.

Audio Format:

  • Vorbis (OGG)
  • MP3
  • MP3 (MP4)
  • FLAC
  • CD


Video Format:

  • Android SD Low
  • Android SD High
  • Android HD
  • YouTube SD
  • YouTube HD
  • MPEG4 720p TV/device
  • MPEG4 1080p TV/device
  • DivX compatible player
  • iPod SD
  • iPod HD/iPhone/PSP


Now you can convert your audio or video using VLC media converter easily, have fun :)
Continue Reading...

[How To] Find Out If Your Lenovo Is Infected With The Superfish Adware And Remove It

Users on Lenovo's forums have discovered that the Chinese company has been preloading some consumer PC models with a software called Superfish Visual Discovery. In short, the software tracks your searches and browsing habits (even on secure sites) and uses this information to place additional advertisements on the sites you visit. It's unclear what models have come preloaded with the software, although users have reported finding it on Lenovo Y50, Z40, Z50, G50 and Yoga 2 Pro models.


LastPass has created a Web tool that makes it easy to check to see if your computer is infected. You can check by simply clicking on this link.


If you’re affected by Superfish, you must first uninstall the program:


  1. Click the Windows Start button
  2. Search uninstall program
  3. Launch uninstall program
  4. Right-click on Superfish Inc VisualDiscovery and select Uninstall
  5. If prompted for administrator password, enter or provide confirmation


Then you must uninstall the certificates as well:


  1. Click the Windows Start button
  2. Type certmgr.msc into the Search box
  3. Click the certmgr.msc Program to launch it
  4. If prompted for administrator password, enter the password or provide confirmation
  5. Click on Trusted Root Certification Authorities
  6. Open Certificates
  7. Look for certificates mentioning Superfish Inc.
  8. Right-click on any Superfish Inc certificates and delete


To make sure you have fully removed the program, restart your browser and revisit the LastPass web tool.
Continue Reading...

What is Steganography? How to Hide Text Message behind an Image?

What is Steganography?

Steganography term is originated from Greek word; steganos means “covered” and graphien means “writing”. Steganography is the process of hiding a secret message with ordinary content, generally images, text and then extracting the messages when it reaches the destination. Anyone else who views this message will not be able to see the hidden content.

Steganography


In steganography process, the data is first encrypted & then inserted in the normal the normal content, using special algorithm which may modify the contents of the file.

Steganography technique usually appends the data to a file, and some sophisticated steganography techniques may even disperse it throughout the file.

Program uses specially crafted algorithm which places the encrypted data in such a way that a unique pattern emerges (not visible to other programs, except it).


Common Hiding Techniques:


  • Appending data to a file.
  • Hiding Content in the unused header portion of the file near the beginning of the file contents.
  • Algorithm based dispersing of hidden message throughout the file.
  • Modification of LSP (Least Significant Bit).


Significance of Steganography:

Corporate world uses Steganography for disguising espionage attempts.

It is assumed that terrorist group makes use of Steganography to secretly communicate internally. And who knows, secret services and army uses the same.


Tools used for Steganography:

There are numerous tools used for steganography:


  • Steganos
  • S-tools for hiding data behind GIF & JPEG
  • StegHide for hiding data behind WAV and BMP
  • Invisible Secrets for hiding data behind JPEG
  • JPHide
  • Hiderman
  • and many more!

File extensions bmp, jpeg, gif, wav and mp3 are generally used to carry hidden messages.


How to Hide Text Message in an Image using CMD:

Now, we’ll be hiding our text message behind an image using CMD (command prompt). This is the very basic example of steganography (Appending data to a file).


  1. Arrange a file (in our case it’s sample.png) and a text message file (in our case it’s a.txt).
  2. Open the command Prompt (Press Window Key+R then type CMD).
  3. Locate the path to your files (in our case it’s C:\Users\Ammy5\stegano).
  4. Type the command COPY /B sample.png + a.txt newfile.jpg  OR  ECHO hey it's a secret message >> sample.png
  5. Done! Newfile.jpg contains your hidden message.

Steganography Commands


Note: If you understand DOS commands a little bit you can simple use the command

Syntax: ECHO “Steganography Hidden message here” >> sample.png

Command:  ECHO hey it's a secret message >> sample.png

This DOS command will simple echo or write your text message inside the file.


How to reveal hidden text message from image?

You just have to open your steganography’s image file in a text editor like WordPad, notepad etc.


Revealing Hidden Messages


What is Steganalysis? What are the tools Required?

Steganalysis is a study of identifying existence of hidden messages behind commonly used carrier files, the historical meaning of steganalysis means revealing the data, but in the modern world we usually use it while digitally hiding the data.

In simple words, steganalysis deal with the hidden content and identifying its existence.

Methods used for the detecting the use of Steganography:

  • Statistical Analysis
  • LSB Analysis
  • Noise floor Consistency Analysis

A few words on Steganography, There is a lot more to be learned in both Steganography and Steganalysis. You have just seen a very-very basic example which is no way used in real world for any purpose. As the above method of steganography provides next to no real security, don’t use it in real world for confidential purpose.
Continue Reading...

[How To] Remove File or Folder Deletion Error


It is a very common and annoying message that the file or folder you are trying to delete can't be deleted or the pen drive can't be removed as it is used by the system. In this tutorial I'll show you how to delete the files and folders if you get such an error.

Steps:

Step 1: Download the Unlocker Software. Click to download.

Step 2: Right click the File (or) Folder that you are going to delete & select Unlocker.

Step 3: In shown dialog box, Choose Delete action in the Drop down list box.

Step 4: As a result, you can see your chosen folder (or) file will be deleted.


Thanks for giving time and reading this post. I hope you would have liked this post. Any Queries, Thoughts or Views ? Leave here in comment section. 
Continue Reading...

[How to] Spoof MAC Address on Android Phones

A Media Access Control address (MAC address) is a 12-character unique identifier assigned to a specific piece of hardware such as the network adapter of your WiFi device. In simple words, a MAC address can be used to uniquely identify your Android phone on the Internet or the local network.


Spoofing MAC Address on Android Devices

Even though MAC address is embedded on the hardware device during manufacture, it can still be spoofed to input a new one of your choice. Here is a detailed instruction on how to spoof MAC address on your Android phone.

Before you spoof the MAC address, you need to record the original/current MAC address of your device which can be done according to the instruction below:


  • On the Home Screen of your phone, tap Menu button and go to Settings.
  • Tap About Device and go to Status
  • Now scroll down to record the 12-digit code shown under Wi-Fi Mac address. An address would read something like:
    • Example: MAC address: E5:12:D8:E5:69:97


Requirements for Spoofing the MAC Address


  • Rooted Android Phone
  • BusyBox app installed on your phone
  • Once BusyBox is installed, you need to install Terminal app


Once the above requirements are satisfied, follow the instructions below to spoof your MAC address:

Open the Terminal app and type the commands as listed below:

$ su [HIT ENTER]

$ busybox iplink show eth0 [HIT ENTER]
(This will show your current MAC address, just for your confirmation)

Now, type the following command:

$ busybox ifconfig eth0 hw ether XX:XX:XX:XX:XX:XX [HIT ENTER]
(In the above command, replace XX:XX:XX:XX:XX:XX with your new MAC address)
You have now spoofed your MAC address successfully. To check for the change enter the following command again:

$ busybox iplink show eth0 [HIT ENTER]
(Now you should see your new MAC address)
Continue Reading...

Retrieve Clipboard History in Windows

Ever copied a code snippet or text from the web and forgot to paste it before you copied something else? So, wondering to know how to retrieve clipboard history?


Well, all of us will have an experience of something like this where we want to desperately retrieve those information that was once copied to the clipboard. But since Windows clipboard will only remember the last item that was copied onto it, it would seem impossible to recover the information that was copied earlier. However, this problem can be solved using any of the following alternative clipboard managers in place of the default one.

In this post you will find a few such alternative clipboard managers for Windows using which it would be possible to save and retrieve every piece of information that was copied to the clipboard. Here’s a quick list:

1. Clipdiary

Clipdiary


This tool is a powerful clipboard manager which will store every piece of information that was copied to the clipboard including text, images or any other file. Clipdiary automatically loads upon Windows startup and maintains a database to store the history of all copied items.

This makes it possible to retrieve the information that was once copied to the clipboard, be it the last hour or the last week. Clipdiary is a shareware tool which comes with a 30 day fully functional evaluation period.

Download Clipdiary


2. ClipMagic

ClipMagic is similar to Clipdiary but includes a few extra features that could seem handy for advanced users. The following are some of the extra features of ClipMagic that are not present in Clipdiary:


  • Categorize/organize your clips. You can also create filters/rules for your incoming clips
  • You can store/categorize your ideas to research fast
  • Assign often used text like email signatures to hotkeys


Download ClipMagic


3. Ditto

Ditto is a powerful alternative to the default Windows clipboard manager which is an open source tool. It keeps track of all the copied items such as text, images and other files so that you can retrieve them whenever necessary. The following are some of the highlights of Ditto:

Assign hotkeys to frequently used clippings
Search and organize the clippings based on task or project
Supports unicode so that you can copy foreign and non-standard characters without any issues
Get a preview of all the copied items including thumbnails of images just by pressing the assigned hotkey
Ditto comes as a freeware so that you can enjoy all of its features free of cost
Even though Ditto is a freeware, it is still comparable to the two shareware tools discussed earlier. So in my opinion Ditto is always the first choice. You may still download and try all the three and keep the one that you like!

Download Ditto

I hope you enjoyed this post!
Continue Reading...

What Is A Batch File & How To Write A Simple Batch File?


What is a Batch (.bat) File ?

A batch file contains a series of DOS commands, and is commonly written to automate frequently performed tasks. Instead of typing the same commands over and over, you can simply double-click the batch file. Writing a batch file is easier than it looks; the difficult part is making sure that everything happens in the right order. Well-made batch files can save you a lot of time over the long run, especially if you deal in repetitive tasks.


Note: In Linux, shell scripts are used instead of batch files


How to write a simple Batch(.bat) File?

Step 1: Open Notepad. Notepad allows you to create code as a text file and then save it when you're done as a batch file. You can open Notepad by clicking Start → Programs → Accessories → Notepad. You can also enter notepad into the Run box.


Step 2: Learn some basic batch commands. Batch files run a series of DOS commands, so the commands that you can use are similar to DOS commands. Some of the more important ones include:
  • ECHO - Displays text on the screen
  • @ECHO OFF - Hides the text that is normally output
  • START - Run a file with it's default application
  • REM - Inserts a comment line in the program
  • MKDIR/RMDIR - Create and remove directories
  • DEL - Deletes a file or files
  • COPY - Copy a file or files
  • XCOPY - Allows you to copy files with extra options
  • FOR/IN/DO - This command lets you specify files.


Step 3: Write a program to create a directory. One of the easiest ways to learn how to create batch files is to focus on doing basic tasks first. For example, you can use a batch file to quickly create multiple directories.

MKDIR c:\example1
MKDIR c:\example2


Step 4: Save the file. Once you have entered your code, you can save the file using the Batch filetype.
  • Click File → Save As.
  • Click the "Save as type" dropdown menu.
  • Select "All files".
  • Enter a name for the program followed by .bat


Step 5: Write the code to make a basic backup program. Batch files are great for running multiple commands, especially if you configure it to be able to run multiple times. With the XCOPY command, you can make a batch file that copies files from select folders to a backup folder, only overwriting files that have been updated since the last copy:

@ECHO OFF 
XCOPY c:\original c:\backupfolder /m /e /y

This copies over files from the folder "original" to the folder "backupfolder". You can replace these with the paths to the folders you want.
 /m specifies that only updated files will be copied,
 /e specifies that all subdirectories in the listed directory will be copied, and
 /y keeps the confirmation message appearing every time a file is overwritten.

Step 6: Save the file. Once you have entered your code, you can save the file using the Batch filetype.
  • Click File → Save As.
  • Click the "Save as type" dropdown menu.
  • Select "All files".
  • Enter a name for the program followed by .bat

Step 7: Write a more advanced backup program. While simply copying the files from one folder to another is nice, what if you want to do a little sorting at the same time? That's where the FOR/IN/DO command comes in. You can use that command to tell a file where to go depending on the extension:

@ECHO OFF 
cd c:\source
REM This is the location of the files that you want to sort
FOR %%f IN (*.doc *.txt) DO XCOPY c:\source\"%%f" c:\text /m /y
REM This moves any files with a .doc or 
REM .txt extension from c:\source to c:\text
REM %%f is a variable
FOR %%f IN (*.jpg *.png *.bmp) DO XCOPY C:\source\"%%f" c:\images /m /y
REM This moves any files with a .jpg, .png, 
REM or .bmp extension from c:\source to c:\images

Step 8: Save the file. Once you have entered your code, you can save the file using the Batch filetype. 
  • Click File → Save As.
  • Click the "Save as type" dropdown menu.
  • Select "All files".
  • Enter a name for the program followed by .bat
Continue Reading...

Hide Hard Disk Drive Without Using Any Third Party Software (Windows PC)


If you have some personal matters in your hard drive that you don't want to share with any one. Then, this trick may help you a lot. We can do this using Third Party Software of course. But, for doing this without any third party software. You have to just unassign the letter assigned to your drive. If you don't know how to assign/unassign letter to an specific drive you have to follow these steps:

Step 1: Right Click on My Computer and Click on Manage.


Step 2: Then, Click on Disk Management In Left Side under Storage option.    


Step 3: Right Click on Drive which you want to Hide.

Step 4: Then, Click on Change Drive Letter and Paths.


Step 5: Finally, Click on Remove and then, Click on YES.


Step 6: Check My Computer, Drive is disappeared. ;)


And YES! You have done it without using any software. :)


Continue Reading...