blog
Scan QR Code To Quick Access The Digital Orbis
Showing posts with label How to guide. Show all posts

[How To] Apply For PAN Card Using Umang App

There was a time when you have to follow the tiresome process of getting a PAN card. But now with Prime Minister Narendra Modi's Digital India initiative it is possible to apply for a new PAN card using your smart phone. You can get your PAN card using Umang app introduced by government. This app comes with 100+ facility for online government services.


How to Apply for PAN Card Using Umang App


To apply for PAN card using your smart phone, you need to download Umang app first. After the installation, you need to complete the following steps.

  1. Now open the App & click on My PAN service.
  2. By clicking on it, you can register for the PAN application by completing KYC.
  3. Then you need to fill all the essential details like Name, Date of Birth, Mobile Number and Aadhar Number.
  4. Now you will receive an OTP on your registered Aadhar mobile number.
  5. After that your submission is complete, and you get an application number.
  6. After getting the application number, you can go to the "Make Payment Page" to complete the transaction.
This online process is a time-saving process for both the government and the public. Now you don’t need to stay in queue to visit a mediator or dealer to get a new PAN card. Umang App currently acts as the middle man and provides safe and secure government services not only for PAN but also for various other government services. This process is user-friendly. Sometimes, a PAN card goes missing when applied offline. But now, the government with this new process promises a secure way for the general public to get a new PAN card.


Continue Reading...

[How To] Delete Junk Photos From WhatsApp Automatically

This article is one of the most needful article about How to delete junk/useless photos from WhatsApp automatically. WhatsApp is the largest instant messenger app at the present time. Most of our device storage space is occupied by the photos/videos downloaded from WhatsApp. We all have friends and relatives who diligently send us quotes, memes they've received from their network. Most of the people thinks that this is their national duty to wake up people with these Good morning and inspirational quotes photos 😆. Most of us find it useless and junk media and give our time to delete them by selecting and checking it out manually one by one. This was the most simple simple solution that is used by us to get rid of these type of junk photos. To ease this task, Siftr, an Indian startup found by ex-Adobe employees, has launched a smart and intelligent Android App that can help you to get rid of these junk photos from WhatsApp automatically. This app is named as Magic Cleaner.


How To Delete Junk Photos From WhatsApp Automatically

This method is very easy to follow where all your junk pictures are scanned and deleted automatically by this app. So,Follow the steps below.

Step 1: Download and install Magic Cleaner app from Google Play Store.

Siftr Magic Cleaner Play Store


Step 2: Once the App is installed open the app and allow all the permissions to scan your images in your phone.

Magic Cleaner Home


Step 3: Click on Show me the magic. Then, a doctor will appear click on him to scan your phone for junk images.

Magic Cleaner Search Results


Step 4: Once the scan is done,you can see all the junk images and you can deselect if you need any images listed.

Magic Cleaner Delete Photos


Step 5: It also shows how much memory these junk images occupied and now delete all the junk from your phone by a single click.

This is the most easy and suitable way to delete junk WhatsApp photos from your Android phone. Now, when you know that How to delete junk photos from WhatsApp automatically. Share this post with your friends and relatives and yes don't forget to share your views and comments below.

Continue Reading...

[How To] Customize Right Click Menu Options in Windows

Have you ever been in a situation when you wanted to see an additional option on the right click to do whatever you want? Like you want to open Notepad just by right clicking and selecting Notepad option or Showing and Hiding files just by right clicking on it.  Then, here is a simple registry hack that will make you do it for you.

[How To] Customize Right Click Menu Options in Windows


I'll show you two demonstrations. In the first one, I'll show you How to add a new option in the Right Click Context Menu and in the second one, How to add new options in the Right Click Context Menu of files.

Let's start with the first one.

Demo 1: How to add a new option in the Right Click Context Menu


Step 1: Click on Start Menu and open Run application.

                                        OR

Just press Window + R keys to open Run application.

Run

Run


Step 2: Write "regedit" and press Enter.

Step 3: Expand HKEY_CLASSES_ROOT and browse down to the following key:

HKEY_CLASSES_ROOT\Directory\Background\shell

[How To] Customize Right Click Menu in Windows


Step 4: Right click on shell and click on New > Key.

[How To] Customize Right Click Menu in Windows


Step 5: Give the new key the name that you want to show up on the desktop context menu. In our example, we're using "Notepad".

[How To] Customize Right Click Menu in Windows


Step 6: Right click on Notepad and click on New > Key. Enter the key name "command" (without quotes and in small letters).

[How To] Customize Right Click Menu in Windows


Recommended Post: [How To] Add Apps to Startup in Windows 10

Step 7: There will be a (Default) key with type "REG_SZ". Double click on it and write Notepad.exe in the value data field as shown in the screenshot.

Think this "value data" as a command that will get executed in the Command Prompt. Writing Notepad.exe in the Command Prompt opens up Notepad, that's why we have written Notepad.exe in the "value data". 

Now, what if you want to open Paint program from the command prompt, what will you write? Paint.exe? Nooooooo. You will have to write there mspaint.exe because Paint program is defined as "mspaint.exe" program in windows/system32 folder and what if you want to open any third party program? Then, you have to put the full path of that executable file(.exe) in the "value data" field.

Click Ok.


[How To] Customize Right Click Menu in Windows

[How To] Customize Right Click Menu in Windows


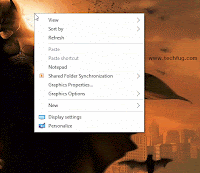
And we are done. Right click on the desktop or inside any directory, you'll see Notepad option there. Just click and it'll open Notepad for you.

Right click Notepad


And now we come to the second one.

Demo 2: How to add new options in the Right Click Context Menu of files


Step 1 and Step 2 are similar as above.


Step 3: Expand HKEY_CLASSES_ROOT and browse down to the following key:

HKEY_CLASSES_ROOT\*\shell


Step 4: Follow the same steps as above to add new options. In our case, we've added two new options Show and Hide. Create a new Key inside both of the options as "command" (same as we created on Demo 1).

[How To] Customize Right Click Menu in Windows

[How To] Customize Right Click Menu in Windows

[How To] Customize Right Click Menu in Windows


Step 5: There will be a (Default) key with type "REG_SZ". Double click on it and write attrib +h "%1" in the value data field.

As I said earlier, that we can write any command that we can execute in the Command Prompt. So, I have written attrib command here, that helps us to change attributes of a file or folder. In attrib +h "%1" command, +h option hides a file/folder and "%1" is the parameter that is bound to the name of the file right clicked, means the file on which it'll perform the action.
Now, click Ok button and we're done with "Hide" option.
Same thing can be done for "Show" option, we just have to replace the +h option with -h


Recommended Post: Top 12 Google Chrome Tips & Tricks


[How To] Customize Right Click Menu in Windows

[How To] Customize Right Click Menu in Windows

[How To] Customize Right Click Menu in Windows

[How To] Customize Right Click Menu in Windows

[How To] Customize Right Click Menu in Windows

[How To] Customize Right Click Menu in Windows

[How To] Customize Right Click Menu in Windows

[How To] Customize Right Click Menu in Windows


Now, test it by right clicking on any file it should work perfectly. Check the gif below to see the things working.

Hide Show GIF

Continue Reading...

[How To] Remotely Access Another Computer


Remotely Access Another Computer


Remote connection to another computer is the best way to transfer and receive the data between computers. Remote connections are commonly made using internet connection. By remote connections, we can easily control each and everything on another computer.

We can obtain all files even we can copy files from one computer to another computer remotely further we can shut down and can have admin entrance to that computer. With the good internet connection, it feels like we are really working on another computer. We can also chat with another PC user With Remote Computer Access. In this post, we will tell you the best methods to Remotely Access Another Computer.

How To Remotely Access Another Computer From Your Computer


Method 1: Remote Computer Access Using Google Chrome


Step 1. First Download the extension Chrome Remote Access in your Google Chrome.

chrome remote desktop


Step 2. Now this app will get added to your chrome and you can see it at right uppermost corner. Click on it and click continue.

chrome remote access extension


Now it will ask to allow access to data, proceed with allowing access to it.

chrome remote desktop allow access


Step 3. Now it will ask you to connect to another computer or share your computer. Now if you click on share this computer then it will generate a code.

Remote Computer Access Using Google Chrome


Step 4. Send the code to the partner by whom you want to accessed your computer. Note that other computer must have the same app installed on its computer. Now your partner will enter his code and your desktop will get the share to him exactly same as you can see yours.

Remote Computer Access Using Google Chrome


Step 5. By this anyone having access code can access your computer remotely and even you can
access someone else’s computer by having access code of it.

Method 2: Using Team Viewer


Team Viewer is very popular software to access any computer remotely.

Features Of Team Viewer:


  • Remote Computer Access
  • Text Chatting with partner
  • Video Calling
  • Remote File Transfer
  • Screenshot Capturing
  • Lock computer screen


Steps To Remote Computer Access Using Team Viewer.

Step 1. Download and install Team Viewer software in your computer. Your computer must be connected to the internet.

Step 2.  Now it will display User Id and Password. If you want your partner to access your computer then send him/her your user id and password.

Remote Computer Access Using Team Viewer


Step 3. If you want to access someone’s computer then get the User Id and password of Team Viewer of that computer. Now click on Connect To partner and type User Id of partner and then it will ask for the password. Fill in the password and press Enter.

Remote Computer Access Using Team Viewer


Step 4. Now it will start connecting your computer to another computer and finally, you can remotely access any computer. By this method, you can undoubtedly have remote access over another computer.

Method 3. Using Remote Desktop Connection


With Remote Desktop Connection, you can connect to a computer running Windows from another computer running Windows which is connected to the same network or to the Internet. For example, you can use all of your work computer’s programs, files, and network resources from your home computer, and it’s just like you’re sitting in front of your computer at work.

How To Use Remote Desktop Connection?

Step 1. You need to browse My Computer>Properties>Advance system settings.

Remote Computer Access Using Remote Desktop


Step 2. Now select the tab named “Remote” and then make sure to enable the option of “Allow connections only for computer running Remote Desktop with Network Level Authentication“.

Remote Computer Access Using Remote Desktop


Step 3. Now whenever your family members or you want to work on your computer from different locations you need to open Remote Desktop and have to enter the Name or IP Address of your own computer.

Remote Computer Access Using Remote Desktop


That’s it now you can easily access your computer from anywhere all you just need is to enable the inbuilt function of windows named Remote Desktop Connection.

Remote Computer Access Using Remote Desktop


So these are the methods to have Remote Computer Access. By connecting remotely, you can control your friend’s, employee and any of other’s computer and can even solve their problems by just sitting in front of your computer. You can also have Text Chatting and Video Calling by these methods. I hope you like this post.
Continue Reading...

[How To] Download Instagram Photos & Videos On Android Devices

Instagram is the fastest growing social platform that allows you to share your photos and videos. There might be some cases when you want to access a video when you are offline. So, here is the method to download Instagram photos and videos on your android device. Generally, Instagram allows you to only watch these videos and photos but does not permit you to download them. So, it creates a big problem if you want to download Instagram photos and videos. So, if you are searching for how to download Instagram videos and photos on android devices, then you are at the right place.

How to Download Instagram Photos And Videos On Android Devices


There are so many apps available for android to download Instagram photos and videos. However, the question arises that which one is the best application to download photos and videos? Here I’m going to share the top two apps to download Instagram photos and videos.

Using Instagetter


InstaGetter is a utility app, which helps to download images and videos from PUBLIC profile in a fast and easy way. Moreover, the offline videos can be viewed in a built-in player with looping mode. So, we have mentioned some simple steps which would help you in setting up Instagetter :

Step 1. First of all, download the Instagetter and install it your android device.

Instagetter - How to Download Instagram Photos And Videos On Android


Step 2. Now open your Instagram app and open the video/photo which you want to download. Now you have to copy the URL of the Instagram videos/photo which you want to download. For this click on right corner button as shown in below screenshot and the copy share URL.

Instagetter 2 - How to Download Instagram Photos And Videos On Android


Step 3. Now just open the Instagetter app and paste the copied URL into the app.

Instagetter - How to Download Instagram Photos And Videos On Android


Step 4. The app will check the URL and open the thumbnail of the valid video or photo.

Instagetter 4 - How to Download Instagram Photos And Videos On Android


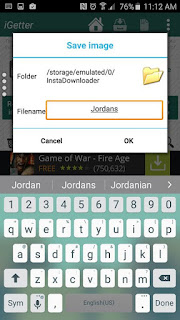
Step 5. Now tap on download to start download Instagram photos and videos on android.

Instagetter Save Photos


Also Read: Top 12 Google Chrome Tips & Tricks

Using InstaSave


InstaSave allows you to download Instagram photos to your device memory, allowing you to see them anytime, anywhere. Let’s know how to use Instasave.

Step 1. You need to download Instasave and sign in with your Instagram account. You need to find an image that you want to save.

Instasave - Select Images


Step 2. Now click on the save button which is located on the top right of the screen.

Instasave - Save Photos


That’s it you can now see your saved photos in your Gallery. This is the easiest method out there if you want to save any Instagram photos.

Also Read: [How To] do Reverse Google Image Search on Your Mobile Phone

There are some similar apps available in the play store to download Instagram photos and videos on your android, but Instagetter and InstaSave are best amongst all. Now you can download your desired photos and videos from Instagram by using these two apps. Hope you like the post. Share it with your friends too!
Continue Reading...

[How To] Add Apps to Startup in Windows 10

How to manage startup apps


To manage startup apps, you need to review all of them so you can turn off the ones you don't want. This can be done via Task Manager in Windows 10. All you need to do is to open the Task Manager app and go to the Startup tab:

Start Up Tab

Tip: You open the Startup tab of Task Manager directly in Windows 10 by running the following command:

taskmgr /0 /startup


Press Win + R shortcut keys together on the keyboard and type the command mentioned above in the Run box.

On the Startup tab you will see the full list of apps which start with Windows.

Using the Startup tab of Task Manager, you can easily prevent an app from starting with your OS. It is very easy - just right click the desired app and pick "Disable" from the context menu.

 Disable Startup Software Windows 10


To enable the disabled app, you just need to right click it again and choose the "Enable" command from the context menu.

Enable Startup App Windows 10


Now you know how to enable or disable startup apps. Let's see how to add a new app to load at startup or remove an existing one.

How to add or remove startup apps for the current user


Startup items for the current user are stored usually at two locations: the Registry and the special "Startup" folder. The Startup folder is an easier way to manage apps. To add or remove an app from the Startup folder, you need to do the following:

Press Win + R shortcut keys together and type the following into the Run box:

shell:Startup


The text above is a special shell command which will open the Startup folder for you directly.

 Startup Folder in Windows 10


The Startup folder is located here:

C:\Users\Your user name\AppData\Roaming\Microsoft\Windows\Start Menu\Programs\Startup


Just copy and paste a shortcut in this folder so that the app loads when Windows boots. To remove the application from the Startup folder, delete the appropriate shortcut.


That's it!

Share your views in the comments! :)
Continue Reading...