blog
Scan QR Code To Quick Access The Digital Orbis
Showing posts with label Windows. Show all posts

[How To] Customize Right Click Menu Options in Windows

Have you ever been in a situation when you wanted to see an additional option on the right click to do whatever you want? Like you want to open Notepad just by right clicking and selecting Notepad option or Showing and Hiding files just by right clicking on it.  Then, here is a simple registry hack that will make you do it for you.

[How To] Customize Right Click Menu Options in Windows


I'll show you two demonstrations. In the first one, I'll show you How to add a new option in the Right Click Context Menu and in the second one, How to add new options in the Right Click Context Menu of files.

Let's start with the first one.

Demo 1: How to add a new option in the Right Click Context Menu


Step 1: Click on Start Menu and open Run application.

                                        OR

Just press Window + R keys to open Run application.

Run

Run


Step 2: Write "regedit" and press Enter.

Step 3: Expand HKEY_CLASSES_ROOT and browse down to the following key:

HKEY_CLASSES_ROOT\Directory\Background\shell

[How To] Customize Right Click Menu in Windows


Step 4: Right click on shell and click on New > Key.

[How To] Customize Right Click Menu in Windows


Step 5: Give the new key the name that you want to show up on the desktop context menu. In our example, we're using "Notepad".

[How To] Customize Right Click Menu in Windows


Step 6: Right click on Notepad and click on New > Key. Enter the key name "command" (without quotes and in small letters).

[How To] Customize Right Click Menu in Windows


Recommended Post: [How To] Add Apps to Startup in Windows 10

Step 7: There will be a (Default) key with type "REG_SZ". Double click on it and write Notepad.exe in the value data field as shown in the screenshot.

Think this "value data" as a command that will get executed in the Command Prompt. Writing Notepad.exe in the Command Prompt opens up Notepad, that's why we have written Notepad.exe in the "value data". 

Now, what if you want to open Paint program from the command prompt, what will you write? Paint.exe? Nooooooo. You will have to write there mspaint.exe because Paint program is defined as "mspaint.exe" program in windows/system32 folder and what if you want to open any third party program? Then, you have to put the full path of that executable file(.exe) in the "value data" field.

Click Ok.


[How To] Customize Right Click Menu in Windows

[How To] Customize Right Click Menu in Windows


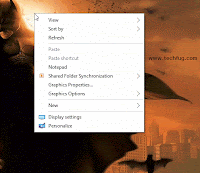
And we are done. Right click on the desktop or inside any directory, you'll see Notepad option there. Just click and it'll open Notepad for you.

Right click Notepad


And now we come to the second one.

Demo 2: How to add new options in the Right Click Context Menu of files


Step 1 and Step 2 are similar as above.


Step 3: Expand HKEY_CLASSES_ROOT and browse down to the following key:

HKEY_CLASSES_ROOT\*\shell


Step 4: Follow the same steps as above to add new options. In our case, we've added two new options Show and Hide. Create a new Key inside both of the options as "command" (same as we created on Demo 1).

[How To] Customize Right Click Menu in Windows

[How To] Customize Right Click Menu in Windows

[How To] Customize Right Click Menu in Windows


Step 5: There will be a (Default) key with type "REG_SZ". Double click on it and write attrib +h "%1" in the value data field.

As I said earlier, that we can write any command that we can execute in the Command Prompt. So, I have written attrib command here, that helps us to change attributes of a file or folder. In attrib +h "%1" command, +h option hides a file/folder and "%1" is the parameter that is bound to the name of the file right clicked, means the file on which it'll perform the action.
Now, click Ok button and we're done with "Hide" option.
Same thing can be done for "Show" option, we just have to replace the +h option with -h


Recommended Post: Top 12 Google Chrome Tips & Tricks


[How To] Customize Right Click Menu in Windows

[How To] Customize Right Click Menu in Windows

[How To] Customize Right Click Menu in Windows

[How To] Customize Right Click Menu in Windows

[How To] Customize Right Click Menu in Windows

[How To] Customize Right Click Menu in Windows

[How To] Customize Right Click Menu in Windows

[How To] Customize Right Click Menu in Windows


Now, test it by right clicking on any file it should work perfectly. Check the gif below to see the things working.

Hide Show GIF

Continue Reading...

[How To] Remotely Access Another Computer


Remotely Access Another Computer


Remote connection to another computer is the best way to transfer and receive the data between computers. Remote connections are commonly made using internet connection. By remote connections, we can easily control each and everything on another computer.

We can obtain all files even we can copy files from one computer to another computer remotely further we can shut down and can have admin entrance to that computer. With the good internet connection, it feels like we are really working on another computer. We can also chat with another PC user With Remote Computer Access. In this post, we will tell you the best methods to Remotely Access Another Computer.

How To Remotely Access Another Computer From Your Computer


Method 1: Remote Computer Access Using Google Chrome


Step 1. First Download the extension Chrome Remote Access in your Google Chrome.

chrome remote desktop


Step 2. Now this app will get added to your chrome and you can see it at right uppermost corner. Click on it and click continue.

chrome remote access extension


Now it will ask to allow access to data, proceed with allowing access to it.

chrome remote desktop allow access


Step 3. Now it will ask you to connect to another computer or share your computer. Now if you click on share this computer then it will generate a code.

Remote Computer Access Using Google Chrome


Step 4. Send the code to the partner by whom you want to accessed your computer. Note that other computer must have the same app installed on its computer. Now your partner will enter his code and your desktop will get the share to him exactly same as you can see yours.

Remote Computer Access Using Google Chrome


Step 5. By this anyone having access code can access your computer remotely and even you can
access someone else’s computer by having access code of it.

Method 2: Using Team Viewer


Team Viewer is very popular software to access any computer remotely.

Features Of Team Viewer:


  • Remote Computer Access
  • Text Chatting with partner
  • Video Calling
  • Remote File Transfer
  • Screenshot Capturing
  • Lock computer screen


Steps To Remote Computer Access Using Team Viewer.

Step 1. Download and install Team Viewer software in your computer. Your computer must be connected to the internet.

Step 2.  Now it will display User Id and Password. If you want your partner to access your computer then send him/her your user id and password.

Remote Computer Access Using Team Viewer


Step 3. If you want to access someone’s computer then get the User Id and password of Team Viewer of that computer. Now click on Connect To partner and type User Id of partner and then it will ask for the password. Fill in the password and press Enter.

Remote Computer Access Using Team Viewer


Step 4. Now it will start connecting your computer to another computer and finally, you can remotely access any computer. By this method, you can undoubtedly have remote access over another computer.

Method 3. Using Remote Desktop Connection


With Remote Desktop Connection, you can connect to a computer running Windows from another computer running Windows which is connected to the same network or to the Internet. For example, you can use all of your work computer’s programs, files, and network resources from your home computer, and it’s just like you’re sitting in front of your computer at work.

How To Use Remote Desktop Connection?

Step 1. You need to browse My Computer>Properties>Advance system settings.

Remote Computer Access Using Remote Desktop


Step 2. Now select the tab named “Remote” and then make sure to enable the option of “Allow connections only for computer running Remote Desktop with Network Level Authentication“.

Remote Computer Access Using Remote Desktop


Step 3. Now whenever your family members or you want to work on your computer from different locations you need to open Remote Desktop and have to enter the Name or IP Address of your own computer.

Remote Computer Access Using Remote Desktop


That’s it now you can easily access your computer from anywhere all you just need is to enable the inbuilt function of windows named Remote Desktop Connection.

Remote Computer Access Using Remote Desktop


So these are the methods to have Remote Computer Access. By connecting remotely, you can control your friend’s, employee and any of other’s computer and can even solve their problems by just sitting in front of your computer. You can also have Text Chatting and Video Calling by these methods. I hope you like this post.
Continue Reading...

[How To] Add Apps to Startup in Windows 10

How to manage startup apps


To manage startup apps, you need to review all of them so you can turn off the ones you don't want. This can be done via Task Manager in Windows 10. All you need to do is to open the Task Manager app and go to the Startup tab:

Start Up Tab

Tip: You open the Startup tab of Task Manager directly in Windows 10 by running the following command:

taskmgr /0 /startup


Press Win + R shortcut keys together on the keyboard and type the command mentioned above in the Run box.

On the Startup tab you will see the full list of apps which start with Windows.

Using the Startup tab of Task Manager, you can easily prevent an app from starting with your OS. It is very easy - just right click the desired app and pick "Disable" from the context menu.

 Disable Startup Software Windows 10


To enable the disabled app, you just need to right click it again and choose the "Enable" command from the context menu.

Enable Startup App Windows 10


Now you know how to enable or disable startup apps. Let's see how to add a new app to load at startup or remove an existing one.

How to add or remove startup apps for the current user


Startup items for the current user are stored usually at two locations: the Registry and the special "Startup" folder. The Startup folder is an easier way to manage apps. To add or remove an app from the Startup folder, you need to do the following:

Press Win + R shortcut keys together and type the following into the Run box:

shell:Startup


The text above is a special shell command which will open the Startup folder for you directly.

 Startup Folder in Windows 10


The Startup folder is located here:

C:\Users\Your user name\AppData\Roaming\Microsoft\Windows\Start Menu\Programs\Startup


Just copy and paste a shortcut in this folder so that the app loads when Windows boots. To remove the application from the Startup folder, delete the appropriate shortcut.


That's it!

Share your views in the comments! :)
Continue Reading...

[How To] Make An Inaccessible, Undeletable & Unrenamable Folder

Make An Inaccessible, Undeletable & Unrenamable Folder


Basic Concept

The basic concept behind this trick is the use of Keywords. Keywords are reserved words in any programming language that cannot be used as names of variables. Windows also uses certain keywords in its programming. Some of them are: con, aux, lpt1, lpt2, lpt3, lpt4, lpt5, lpt6, lpt7, lpt8, lpt9.

Testing
To test this concept, make a new folder in Windows and try to give it a name same as any keyword mentioned above.

Inaccessible Folder Created Using CMD


Result
Windows will not rename your folder to any of the keyword given above.

Trick
So the question arises, how can we make a folder with a keyword as its name? The solution to this problem is included in Windows itself. As we know that Windows has evolved from DOS, its commands can be used in Windows. You can use DOS Programming in Windows to create a folder with a keyword as its name using the steps given below:

Step 1: Click on Start.

Step 2: Click on Run. Type in cmd.

Step 3: In the Command Prompt Window, type the name of the drive you wish to create your folder in the format : and press  e.g. If you wish to create the undeletable folder in D drive, type "D:" without the quotes. Note that the folder cannot be created in the root of C: drive (if C: is your system drive).
Step 4: Type this command:

md con\ 

(where, con\  is the keyword used for folder name) and press . You can choose any of the keywords given above as the name of your folder.

Step 5: Now Windows will create an undeletable, unrenamable & inaccessible folder in the drive you entered in Step 3. However, the folder can be renamed to another keyword using Windows Explorer.


Post You May Like: [Tool] Who Is The Owner Of A Blogger Blog/Website?


Deleting the Folder
Although, it is not possible to delete the folder using Windows GUI, you can delete the folder by typing

rd con\


(where, con\  is the keyword used for folder name)

Windows Compatibility: Windows XP and higher versions.

Try it yourself to create one such folder which can neither be deleted, accessed nor be renamed & share your experience in the comments.

Continue Reading...

[Download] Pre-Rooted BlueStacks App Player Pro v1.1.11.8004 Rooted+MOD [Offline] [Latest Version]


BlueStacks App Player

BlueStacks HD App Player Pro is a plateform that allows you to run applications, including games written for OS Android – on desktops, laptops and tablets and also this package contains all files to install it offline. This is a special program that uses a technology called LayerCake, which provides the correct environment for running applications for ARM-Android on a computer running Windows. Get Root (right super – user).

After you install BlueStacks on your Windows PC, you can download directly from the program needed Android-app, without having to use the Android-based smartphone. BlueStacks looks pretty neat and fits naturally into the interface Windows.


Features List


  1. Run Android applications in full-screen and not only.
  2. Through the cloud download your application from the phone to Windows.
  3. In 16 player preinstalled applications and you can play them if there is no number.
  4. Ability to set an unlimited number of applications.
  5. Ability to play 3D games (cache).
  6. You can set a home screen (Launcher) to replace the standard, etc.
  7. Sync with your Android device will allow you to make calls, send SMS, take pictures and more.
  8. Has a lot of settings and system settings Android (Although they are slightly trimmed)
  9. Knows how to install applications from a computer at the touch of them
  10. Ability to obtain Root (full access to the file system, etc.)
  11. You can set Google Play, simply speaking market.
  12. BlueStacks great friends with ADB is a very big plus, if you really want, you can change the firmware.
  13. Ability to turn in FastBoot and Recovery.
  14. BluesStacks has virtual disk, such as SD Card, Data, and a few others. Which again gives you the opportunity to do a lot of “body” motions with it and enjoy all its charms.
  15. Ability to obtain Root (full access to the file system)


What’s New ?


  • Bug fixed and improved performance
  • Older Cracked Version Info
  • Simple Launcher Interface
  • SuperUser Support
  • SuperSu Support
  • Import Windows Files directly from your PC to bluestacks
  • Root Explorer Support
  • Advanced Calculator Support
  • Clock, Camera, and other accessories support
  • Root Checker Support
  • Build in Media Player which run mp3, mp4 and many other formats easily
  • Many more…


How to Install?


  1. Extract winrar files and run given app as an administrator
  2. Just wait and follow the instructions during installation of setup into your PC
  3. After Completing the installation; Bluestacks will automatically launch; just select some options which will appear on screen
  4. That’s it. Now run your all apps which supports the Android 4.4.2 and earlier. :)


How to Run Speed Up BlueStacks ?


  • Press Start Button with “R” Key
  • Enter "Regedit"
  • Click on HEKY_LOCAL_MACHINE >>> SOFTWARE
  • Then select Bluestacks >>> Android >>> Hit enter on Memory and replace 300 to 600; then click on decimal and click “OK”
  • That’s it; you will have successfully speed up your bluestacks


Requirements


  • To run 3D games need support virtualization technology Intel® VT-x or AMD-V ™
  • To install the BlueStacks need a video card that supports OpenGL 2.0 or later
  • To start BlueStacks need about 1GB of RAM, otherwise you run the risk of “infinite loading”.
  • For optimum performance, BlueStacks is highly desirable to update your graphics card drivers
  • NVIDIA – (WHQL – certified, stable drivers. Beta – unstable, but can increase in speed)
  • AMD RADEON – (Download drivers – Category components: Desktop / Notebook Graphics)
  • INTEL – (family of products: graphics adapters)


Click here to download the file (Mediafire Link)

Click here to download the file (Dropbox Link)

Sharing is caring. If you think this post helped you, Share this post to every one. :)


Continue Reading...

[How To] Find Out If Your Lenovo Is Infected With The Superfish Adware And Remove It

Users on Lenovo's forums have discovered that the Chinese company has been preloading some consumer PC models with a software called Superfish Visual Discovery. In short, the software tracks your searches and browsing habits (even on secure sites) and uses this information to place additional advertisements on the sites you visit. It's unclear what models have come preloaded with the software, although users have reported finding it on Lenovo Y50, Z40, Z50, G50 and Yoga 2 Pro models.


LastPass has created a Web tool that makes it easy to check to see if your computer is infected. You can check by simply clicking on this link.


If you’re affected by Superfish, you must first uninstall the program:


  1. Click the Windows Start button
  2. Search uninstall program
  3. Launch uninstall program
  4. Right-click on Superfish Inc VisualDiscovery and select Uninstall
  5. If prompted for administrator password, enter or provide confirmation


Then you must uninstall the certificates as well:


  1. Click the Windows Start button
  2. Type certmgr.msc into the Search box
  3. Click the certmgr.msc Program to launch it
  4. If prompted for administrator password, enter the password or provide confirmation
  5. Click on Trusted Root Certification Authorities
  6. Open Certificates
  7. Look for certificates mentioning Superfish Inc.
  8. Right-click on any Superfish Inc certificates and delete


To make sure you have fully removed the program, restart your browser and revisit the LastPass web tool.
Continue Reading...

7 Major Features You Need To Know About Microsoft’s Windows 10

Microsoft showed us the final version of Windows 10 in an event yesterday, and the roll-out will begin later this year. But what’s new in Microsoft’s latest OS? We take a quick look at the biggest and most important features of Windows 10.

1. Free, free, free: For the first time ever, Windows 10 will be a free upgrade for Windows 7, Windows 8.1 and Windows Phone 8.1 users.

Microsoft has taken a cue out of Apple’s book which has been given OS X and iOS upgrades away for free, to ensure that users don’t have to shell out money for an OS.

If your PC or laptop is running Windows 7 and Windows 8.1 and your Windows phone has the Windows Phone 8.1 OS, you will get a free upgrade to the latest version of Windows 10 – in the first year.

What is not clear is if users on laptop and desktops will have to pay after the first year. In an age, where free OS and software is the new mantra, Microsoft has taken the right step by making Windows 10 free of cost. Hopefully the free upgrade will continue after year one as well.

Windows 10 Spartan Browser


2. No more Windows Phone, it’s all the same: Unity across operating systems is something that Apple and Google have been going on about for sometime and Microsoft also clearly believes that this is the way forward.

What this also means, is that the name ‘Windows Phone OS’ is actually defunct. Also tablet users can forget the horror of having to deal with something like a new Windows RT on their devices, which received terrible user feedback.

Windows 10 will ensure that desktops, mobiles, laptops, tablets, 2-in-1 devices will all run the same Windows 10 OS, which will be optimised based on the platform. This is great news for those who are heavily invested in the Windows eco-system and for app developers who won’t have to create a separate app for mobile or tablet.

3. Bigger Start Menu, Action Centre: There have been some improvements thanks to feedback from testers of the Windows Insider program. The Start Menu is now available in full screen instead of the limited in Windows 8.1. The Action Centre has quick buttons to switch Wi-fi and Bluetooth on or off.

There is a new Notification Centre which is seen above the Action Centre and notifications in these will be synced across devices. The Notification centre brings you updates and alerts from your email, weather, news sources you’ve subscribed to and it also has Cortana built in.

The Control Panel and Settings menu have been merged into a single folder. Also when using a 2-in-1, when you go from a desktop mode to a tablet mode, users will be prompted if they want to switch to tablet mode.

4. Cortana for Windows: Microsoft has gone a step ahead of Apple by bringing its personal voice-assistant Cortana to all Windows 10 devices, including desktops and laptops, which is a massive plus point.

On the desktop, Cortana will be seen as a search box located beside the Start button. Cortana now supports 7 languages and can speak in impersonations as well. You can also ask Cortana to open apps on your desktop such as PowerPoint or Word. You can also dictate emails in Outlook using Cortana and send them by voice commands.

Reading View in Spartan Browser


Cortana has a new feature called Notebook that keeps a tab on all the saved information. It also keeps a track of the sports scores, travel, weather and such similar information that you may be interested in. You can also add other things that you want Cortana to keep a track of.

5. Universal apps for PCs: Microsoft is going the Apple way by finally introducing universal apps. These will have a similar design across devices and will work across PCs, laptop, smartphones and tablets.

Outlook will come with an in-built Word engine which provides the Office ribbon, which allows multiple ways of formatting Office documents. The calendar app will also be synced across devices and will sport a consistent design as well. There’s also a new Photo App gallery, which looks inspired by Google+.

All pictures taken on the devices, as well as photos on One Drive will be merged together and the app will automatically delete the duplicate files to reduce the clutter. The Photo app will automatically enhance your photographs by default, much like Google+. It will also create Photo Albums automatically based on date, location and the people in the photographs.

Other universal apps on the list will be for Videos, Music, Maps, People & Messaging.

6. Hello Project Spartan: Microsoft unveiled its Project Spartan at the event, which is indeed a new browser which comes with Cortana built in with its contextual searching. For example, if you look up restaurant on Spartan, Cortana will throw in a map, menu and contact details as well.

On Spartan some of the new features will allows users to annotate a webpage using a stylus or touch interface, click on any section of a webpage to type out a comment and then share this page with friends or co-workers. Also while the page shared will be frozen, the links inside them will be active.

Reading mode in Project Spartan, similar to the reading mode in Apple’s Safari, will put articles in a layout that gets rid of all the unnecessary elements on a page. You also get a Reading List feature that syncs across all devices, even offline, which is quite identical to what’s seen on the Pocket app.

By the way Microsoft has clarified that the introduction of Spartan doesn’t mean that Internet Explorer 11 is going anywhere. According to a blogpost, the company wrote that “Spartan loads the IE11 engine for legacy enterprise web sites when needed.” Essentially enterprise websites that older technologies designed only for Internet Explorer, such as custom ActiveX controls and Browser Helper Objects will load on Internet Explorer, which will also be available on Windows 10.

Internet Explorer will use the same dual rendering engines as Spartan, ensuring web developers can consistently target the latest web standards, says the blog post.

7. Gaming on Windows 10:  The Xbox app will come bundled with all Windows 10 devices. A new feature will allows users to record 30 seconds of gameplay which can be sent across to Xbox Live so that Xbox users can watch it as well.Windows 10 also brings cross-play, which lets users play with a friend on an Xbox One while they are using a Windows 10 PC. Microsoft also has plans to launch Windows 10 on the Xbox One platform.

Game DVR, which gives simple access to recording, editing, and sharing a player’s most epic gaming moments on an Xbox will now come to Windows 10, and is accessible by simply pressing Windows+G.

Also games on Xbox One can be streamed through your home network to your Windows 10 PC or tablet, anywhere in your house. Xbox One gamers will also be able to many of their favourite console games on their PC. And many Xbox One accessories will work interchangeably on the console and PC.
Continue Reading...