blog
Scan QR Code To Quick Access The Digital Orbis
Showing posts with label Windows Solutions. Show all posts

[How To] Customize Right Click Menu Options in Windows

Have you ever been in a situation when you wanted to see an additional option on the right click to do whatever you want? Like you want to open Notepad just by right clicking and selecting Notepad option or Showing and Hiding files just by right clicking on it.  Then, here is a simple registry hack that will make you do it for you.

[How To] Customize Right Click Menu Options in Windows


I'll show you two demonstrations. In the first one, I'll show you How to add a new option in the Right Click Context Menu and in the second one, How to add new options in the Right Click Context Menu of files.

Let's start with the first one.

Demo 1: How to add a new option in the Right Click Context Menu


Step 1: Click on Start Menu and open Run application.

                                        OR

Just press Window + R keys to open Run application.

Run

Run


Step 2: Write "regedit" and press Enter.

Step 3: Expand HKEY_CLASSES_ROOT and browse down to the following key:

HKEY_CLASSES_ROOT\Directory\Background\shell

[How To] Customize Right Click Menu in Windows


Step 4: Right click on shell and click on New > Key.

[How To] Customize Right Click Menu in Windows


Step 5: Give the new key the name that you want to show up on the desktop context menu. In our example, we're using "Notepad".

[How To] Customize Right Click Menu in Windows


Step 6: Right click on Notepad and click on New > Key. Enter the key name "command" (without quotes and in small letters).

[How To] Customize Right Click Menu in Windows


Recommended Post: [How To] Add Apps to Startup in Windows 10

Step 7: There will be a (Default) key with type "REG_SZ". Double click on it and write Notepad.exe in the value data field as shown in the screenshot.

Think this "value data" as a command that will get executed in the Command Prompt. Writing Notepad.exe in the Command Prompt opens up Notepad, that's why we have written Notepad.exe in the "value data". 

Now, what if you want to open Paint program from the command prompt, what will you write? Paint.exe? Nooooooo. You will have to write there mspaint.exe because Paint program is defined as "mspaint.exe" program in windows/system32 folder and what if you want to open any third party program? Then, you have to put the full path of that executable file(.exe) in the "value data" field.

Click Ok.


[How To] Customize Right Click Menu in Windows

[How To] Customize Right Click Menu in Windows


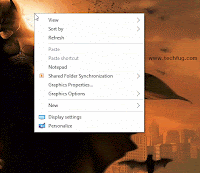
And we are done. Right click on the desktop or inside any directory, you'll see Notepad option there. Just click and it'll open Notepad for you.

Right click Notepad


And now we come to the second one.

Demo 2: How to add new options in the Right Click Context Menu of files


Step 1 and Step 2 are similar as above.


Step 3: Expand HKEY_CLASSES_ROOT and browse down to the following key:

HKEY_CLASSES_ROOT\*\shell


Step 4: Follow the same steps as above to add new options. In our case, we've added two new options Show and Hide. Create a new Key inside both of the options as "command" (same as we created on Demo 1).

[How To] Customize Right Click Menu in Windows

[How To] Customize Right Click Menu in Windows

[How To] Customize Right Click Menu in Windows


Step 5: There will be a (Default) key with type "REG_SZ". Double click on it and write attrib +h "%1" in the value data field.

As I said earlier, that we can write any command that we can execute in the Command Prompt. So, I have written attrib command here, that helps us to change attributes of a file or folder. In attrib +h "%1" command, +h option hides a file/folder and "%1" is the parameter that is bound to the name of the file right clicked, means the file on which it'll perform the action.
Now, click Ok button and we're done with "Hide" option.
Same thing can be done for "Show" option, we just have to replace the +h option with -h


Recommended Post: Top 12 Google Chrome Tips & Tricks


[How To] Customize Right Click Menu in Windows

[How To] Customize Right Click Menu in Windows

[How To] Customize Right Click Menu in Windows

[How To] Customize Right Click Menu in Windows

[How To] Customize Right Click Menu in Windows

[How To] Customize Right Click Menu in Windows

[How To] Customize Right Click Menu in Windows

[How To] Customize Right Click Menu in Windows


Now, test it by right clicking on any file it should work perfectly. Check the gif below to see the things working.

Hide Show GIF

Continue Reading...

[How To] Remotely Access Another Computer


Remotely Access Another Computer


Remote connection to another computer is the best way to transfer and receive the data between computers. Remote connections are commonly made using internet connection. By remote connections, we can easily control each and everything on another computer.

We can obtain all files even we can copy files from one computer to another computer remotely further we can shut down and can have admin entrance to that computer. With the good internet connection, it feels like we are really working on another computer. We can also chat with another PC user With Remote Computer Access. In this post, we will tell you the best methods to Remotely Access Another Computer.

How To Remotely Access Another Computer From Your Computer


Method 1: Remote Computer Access Using Google Chrome


Step 1. First Download the extension Chrome Remote Access in your Google Chrome.

chrome remote desktop


Step 2. Now this app will get added to your chrome and you can see it at right uppermost corner. Click on it and click continue.

chrome remote access extension


Now it will ask to allow access to data, proceed with allowing access to it.

chrome remote desktop allow access


Step 3. Now it will ask you to connect to another computer or share your computer. Now if you click on share this computer then it will generate a code.

Remote Computer Access Using Google Chrome


Step 4. Send the code to the partner by whom you want to accessed your computer. Note that other computer must have the same app installed on its computer. Now your partner will enter his code and your desktop will get the share to him exactly same as you can see yours.

Remote Computer Access Using Google Chrome


Step 5. By this anyone having access code can access your computer remotely and even you can
access someone else’s computer by having access code of it.

Method 2: Using Team Viewer


Team Viewer is very popular software to access any computer remotely.

Features Of Team Viewer:


  • Remote Computer Access
  • Text Chatting with partner
  • Video Calling
  • Remote File Transfer
  • Screenshot Capturing
  • Lock computer screen


Steps To Remote Computer Access Using Team Viewer.

Step 1. Download and install Team Viewer software in your computer. Your computer must be connected to the internet.

Step 2.  Now it will display User Id and Password. If you want your partner to access your computer then send him/her your user id and password.

Remote Computer Access Using Team Viewer


Step 3. If you want to access someone’s computer then get the User Id and password of Team Viewer of that computer. Now click on Connect To partner and type User Id of partner and then it will ask for the password. Fill in the password and press Enter.

Remote Computer Access Using Team Viewer


Step 4. Now it will start connecting your computer to another computer and finally, you can remotely access any computer. By this method, you can undoubtedly have remote access over another computer.

Method 3. Using Remote Desktop Connection


With Remote Desktop Connection, you can connect to a computer running Windows from another computer running Windows which is connected to the same network or to the Internet. For example, you can use all of your work computer’s programs, files, and network resources from your home computer, and it’s just like you’re sitting in front of your computer at work.

How To Use Remote Desktop Connection?

Step 1. You need to browse My Computer>Properties>Advance system settings.

Remote Computer Access Using Remote Desktop


Step 2. Now select the tab named “Remote” and then make sure to enable the option of “Allow connections only for computer running Remote Desktop with Network Level Authentication“.

Remote Computer Access Using Remote Desktop


Step 3. Now whenever your family members or you want to work on your computer from different locations you need to open Remote Desktop and have to enter the Name or IP Address of your own computer.

Remote Computer Access Using Remote Desktop


That’s it now you can easily access your computer from anywhere all you just need is to enable the inbuilt function of windows named Remote Desktop Connection.

Remote Computer Access Using Remote Desktop


So these are the methods to have Remote Computer Access. By connecting remotely, you can control your friend’s, employee and any of other’s computer and can even solve their problems by just sitting in front of your computer. You can also have Text Chatting and Video Calling by these methods. I hope you like this post.
Continue Reading...

[How To] Add Apps to Startup in Windows 10

How to manage startup apps


To manage startup apps, you need to review all of them so you can turn off the ones you don't want. This can be done via Task Manager in Windows 10. All you need to do is to open the Task Manager app and go to the Startup tab:

Start Up Tab

Tip: You open the Startup tab of Task Manager directly in Windows 10 by running the following command:

taskmgr /0 /startup


Press Win + R shortcut keys together on the keyboard and type the command mentioned above in the Run box.

On the Startup tab you will see the full list of apps which start with Windows.

Using the Startup tab of Task Manager, you can easily prevent an app from starting with your OS. It is very easy - just right click the desired app and pick "Disable" from the context menu.

 Disable Startup Software Windows 10


To enable the disabled app, you just need to right click it again and choose the "Enable" command from the context menu.

Enable Startup App Windows 10


Now you know how to enable or disable startup apps. Let's see how to add a new app to load at startup or remove an existing one.

How to add or remove startup apps for the current user


Startup items for the current user are stored usually at two locations: the Registry and the special "Startup" folder. The Startup folder is an easier way to manage apps. To add or remove an app from the Startup folder, you need to do the following:

Press Win + R shortcut keys together and type the following into the Run box:

shell:Startup


The text above is a special shell command which will open the Startup folder for you directly.

 Startup Folder in Windows 10


The Startup folder is located here:

C:\Users\Your user name\AppData\Roaming\Microsoft\Windows\Start Menu\Programs\Startup


Just copy and paste a shortcut in this folder so that the app loads when Windows boots. To remove the application from the Startup folder, delete the appropriate shortcut.


That's it!

Share your views in the comments! :)
Continue Reading...

Best Tricks To Speed Up Internet

Hello everyone! Today I'm gonna share some best methods and tricks to speed up your slow speed internet. Everyone hates to surf internet with a turtle-like internet connection. Yes! you can buy some costly internet plans but if you can't afford that then what you can do. That's what I am going to share with you. These tricks can't help you to get SUPERSONIC speed. But, yeah it can tweak you internet speed than you have at present. So, let's go to straight to the topic.


Best Tricks To Speed Up Internet:

1. Browser Optimization:

Browsers play a vital role between you and internet. Web browser helps to serve you information by fetching it through internet. It depends on browser that with what speed it is gonna serve you that information. In my opinion, Google Chrome Web Browser is the fastest and the most user-friendly web browser than others. As it consumes much less memory and bandwidth than other web browsers.
So, the first thing that you can apply for speeding up you internet speed is switching to Google Chrome.


2. Configuring DNS:

DNS server also plays an important role in increasing the internet speed. This can be achieved by using public DNS servers. There are plenty of public DNS servers but most popular and high speed public DNS servers are listed below:

(i).Google: This DNS server is my favorite DNS server as it is serviced by Google and almost everything that Google provides is the best in its filed.

Google DNS Servers:
Preferred DNS Server: 8.8.8.8
Alternate DNS Server: 8.8.4.4

(ii).OpenDNS: OpenDNS also offers DNS resolution like Google as an alternative to using Internet service providers' DNS servers or locally installed DNS servers.

OpenDNS Servers:
Preferred DNS Server: 208.67.222.222
Alternate DNS Server: 208.67.220.220

(iii).Level 3 DNS: Level 3 is the company that provides a lot of ISPs their connection to the Internet backbone, so they are huge, reliable and secure.

Level 3 DNS Servers:

  • 209.244.0.3
  • 209.244.0.4
  • 4.2.2.1
  • 4.2.2.2
  • 4.2.2.3
  • 4.2.2.4
Now, when you've got the DNS Servers list. You should try to configure it on your system. To configure the manual DNS Servers follow the steps below:

Control Panel  > Networking and Sharing Center > Click on your current internet connection ( WiFi in my case) > Properties > Networking tab > Internet Protocol Version 4 (TCP/IPv4) >  Use the following DNS server addresses > Choose your DNS servers from above and put it here.
> OK

Finally, you've configured your DNS severs successfully. Feel the speed.


3. Commands Tweaks:

Some bunch of command lines can also help you out to reach to a good internet speed. To trigger your speed mode ON using commands follow the steps below:

Step 1:  Open Command Prompt (cmd.exe) with Administrator Mode.
Step 2:  Type following commands one by one in Command Prompt and hit Enter button.

netsh int tcp show global
netsh int tcp set global chimney=enabled
netsh int tcp set global autotuninglevel=normal
netsch int tcp set global congestionprovider=ctcp 


And, you're done!
Now, Surf the internet with a better speed than before. Got any killer trick or tweak to speed up internet? Share in the comments. :)
Continue Reading...

[How To] Remove Shortcut (.lnk) Virus On Windows Using Command Prompt


Steps to remove shortcut virus on Windows:

Step 1: First of all, find out in what drive of your computer the viruses/shortcuts are located. Go to My Computer (for Windows 7 or below) or This PC; you'll notice the C, D, E etc drives.

[Note: This method is the best for removable storage devices]

Step 2: Open the Command Prompt.

Step 3: Type the following commands in Command Prompt & press ENTER

For example, the virus is located in "F" drive, then just type

f:

attrib -h -r -s /s /d f:

del /s *.lnk


f: -> beside the /d is your drive, simply change it to where drive the virus is located.
-h -> to unhide all files on drive (in our case f:).
-r -> create the files on drive is free of read-only attribute.
-s -> to remove the system files attribute from files created by virus.
/s -> to apply attributes on sub-directories also.
/d -> process folders as well.
*.lnk -> delete all files with extension .lnk

Step 4: Check your drive again. All hidden files & folders are now retrieved.
Remove unnecessary files, the shortcut files that are not supposed to be there.
You might find autorun.inf or desktop.ini; simply delete them.

Step 5:  You may also scan your computer/drive with Windows Defender or any other good anti-virus(like Avast!), too. Make sure that the software is updated.
Continue Reading...

[How To] Find Out If Your Lenovo Is Infected With The Superfish Adware And Remove It

Users on Lenovo's forums have discovered that the Chinese company has been preloading some consumer PC models with a software called Superfish Visual Discovery. In short, the software tracks your searches and browsing habits (even on secure sites) and uses this information to place additional advertisements on the sites you visit. It's unclear what models have come preloaded with the software, although users have reported finding it on Lenovo Y50, Z40, Z50, G50 and Yoga 2 Pro models.


LastPass has created a Web tool that makes it easy to check to see if your computer is infected. You can check by simply clicking on this link.


If you’re affected by Superfish, you must first uninstall the program:


  1. Click the Windows Start button
  2. Search uninstall program
  3. Launch uninstall program
  4. Right-click on Superfish Inc VisualDiscovery and select Uninstall
  5. If prompted for administrator password, enter or provide confirmation


Then you must uninstall the certificates as well:


  1. Click the Windows Start button
  2. Type certmgr.msc into the Search box
  3. Click the certmgr.msc Program to launch it
  4. If prompted for administrator password, enter the password or provide confirmation
  5. Click on Trusted Root Certification Authorities
  6. Open Certificates
  7. Look for certificates mentioning Superfish Inc.
  8. Right-click on any Superfish Inc certificates and delete


To make sure you have fully removed the program, restart your browser and revisit the LastPass web tool.
Continue Reading...

[How To] Remove File or Folder Deletion Error


It is a very common and annoying message that the file or folder you are trying to delete can't be deleted or the pen drive can't be removed as it is used by the system. In this tutorial I'll show you how to delete the files and folders if you get such an error.

Steps:

Step 1: Download the Unlocker Software. Click to download.

Step 2: Right click the File (or) Folder that you are going to delete & select Unlocker.

Step 3: In shown dialog box, Choose Delete action in the Drop down list box.

Step 4: As a result, you can see your chosen folder (or) file will be deleted.


Thanks for giving time and reading this post. I hope you would have liked this post. Any Queries, Thoughts or Views ? Leave here in comment section. 
Continue Reading...

Retrieve Clipboard History in Windows

Ever copied a code snippet or text from the web and forgot to paste it before you copied something else? So, wondering to know how to retrieve clipboard history?


Well, all of us will have an experience of something like this where we want to desperately retrieve those information that was once copied to the clipboard. But since Windows clipboard will only remember the last item that was copied onto it, it would seem impossible to recover the information that was copied earlier. However, this problem can be solved using any of the following alternative clipboard managers in place of the default one.

In this post you will find a few such alternative clipboard managers for Windows using which it would be possible to save and retrieve every piece of information that was copied to the clipboard. Here’s a quick list:

1. Clipdiary

Clipdiary


This tool is a powerful clipboard manager which will store every piece of information that was copied to the clipboard including text, images or any other file. Clipdiary automatically loads upon Windows startup and maintains a database to store the history of all copied items.

This makes it possible to retrieve the information that was once copied to the clipboard, be it the last hour or the last week. Clipdiary is a shareware tool which comes with a 30 day fully functional evaluation period.

Download Clipdiary


2. ClipMagic

ClipMagic is similar to Clipdiary but includes a few extra features that could seem handy for advanced users. The following are some of the extra features of ClipMagic that are not present in Clipdiary:


  • Categorize/organize your clips. You can also create filters/rules for your incoming clips
  • You can store/categorize your ideas to research fast
  • Assign often used text like email signatures to hotkeys


Download ClipMagic


3. Ditto

Ditto is a powerful alternative to the default Windows clipboard manager which is an open source tool. It keeps track of all the copied items such as text, images and other files so that you can retrieve them whenever necessary. The following are some of the highlights of Ditto:

Assign hotkeys to frequently used clippings
Search and organize the clippings based on task or project
Supports unicode so that you can copy foreign and non-standard characters without any issues
Get a preview of all the copied items including thumbnails of images just by pressing the assigned hotkey
Ditto comes as a freeware so that you can enjoy all of its features free of cost
Even though Ditto is a freeware, it is still comparable to the two shareware tools discussed earlier. So in my opinion Ditto is always the first choice. You may still download and try all the three and keep the one that you like!

Download Ditto

I hope you enjoyed this post!
Continue Reading...

Hide Hard Disk Drive Without Using Any Third Party Software (Windows PC)


If you have some personal matters in your hard drive that you don't want to share with any one. Then, this trick may help you a lot. We can do this using Third Party Software of course. But, for doing this without any third party software. You have to just unassign the letter assigned to your drive. If you don't know how to assign/unassign letter to an specific drive you have to follow these steps:

Step 1: Right Click on My Computer and Click on Manage.


Step 2: Then, Click on Disk Management In Left Side under Storage option.    


Step 3: Right Click on Drive which you want to Hide.

Step 4: Then, Click on Change Drive Letter and Paths.


Step 5: Finally, Click on Remove and then, Click on YES.


Step 6: Check My Computer, Drive is disappeared. ;)


And YES! You have done it without using any software. :)


Continue Reading...